Tuesday, December 9, 2008
The Best Deal Ever!
Many of you might be familiar with Linda Sattgast's website for digital scrappers, scrappersguide.com, and all the of the wonderful tips she has to offer. You can sign up to receive her newsletter for free that comes out a couple times a month. You can also sign up for a yearly fee and receive her monthly set of tutorials and kit. I have found this subscription very valuable. They have helped me to improve my skill and the free stuff is great! Just this week, Linda announced that in addition to the free elements and paper, she is also including 12 quick pages that are made from that month's kit. I love quick pages. They help get scrapbooking done so quickly. I am so excited for this new feature to be included in my subscription! It is such a deal. Last I checked the fee was $36 for the year, which if you can't tell already, is a SCREAMIN' deal! So, if you never entertained they idea before, check into it now!
Thursday, October 23, 2008
Halloween Freebie
Halloween is just around the corner and so are all those snapshots you will take of great costumes and treats! While working with other projects, I created these Halloween papers with a couple embellishments. Here is a layout that I created of my grandmother as a witch last year with the papers in the kit:
 For as long as I can remember she has been dressing up as a witch and I am pretty sure it is her favorite holiday.
 If you would like to download this kit of five papers, a banner, & sticker, then click here. Happy Halloween!
Thursday, September 11, 2008
Clipping Mask - Templates
Today I was reading an article on clipping masks and learned that you can use them with those layered templates that you can now buy. I think I already knew this from watching a tutorial but I had completely forgot. So, I got on photoshop and tried it out. Boy, that was easy! Usually when I use these templates I select and delete and use all of these time-wasting steps. I tried it both Photoshop and Elements. Yeah! It works in both programs.
1. Open your layered psd file.
2. Drag your papers and photos into the psd file placing them directly above the layer you would like it to apply it to.
3. With your paper/photo layer seleted, Photoshop: Right-click and select "create clipping mask". Elements: Select Layer>Group With Previous.
4. Now you can move the paper/photo layer around until you get in just the right place.
Once I had my pictures selected. This layout probably took me about 15 minutes to complete!
Tuesday, September 9, 2008
Clipping Mask - Photos
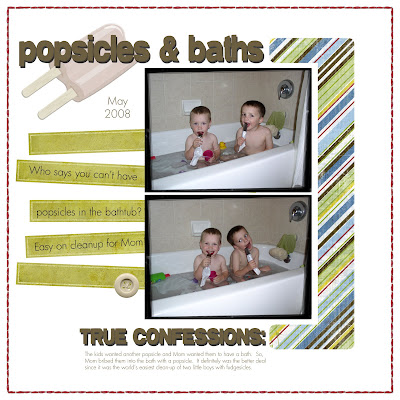
In my last post, I suggested using clipping masks to extend your embellishments even further by pairing them with other papers, etc. In this technique, I used the clipping mask with a photo. It was pretty much the same process. It was a fun way to alter a photo!
 Photoshop Version:
1. Assuming you already have your photo ready, create a new layer for your desired element or brush.
2. Copy your frame to this layer or stamp your brush on it.
3. If you are using a frame or a brush that has an area in the middle that is empty, you will want to fill this. Using your marquee tool, select the area overlapping a little. Then use your bucket and fill it.
4. Move your photo above the brush/frame layer if it is not already in this position.
5. Right-click on the layer name and select Create Clipping Mask.
6. Now you can reposition your photo so that the area you want visible is showing by using your move tool with the photo layer selected. Once this is done you can merge the layers if you like.
If you have Elements, here is one way you can achieve the same results after following steps 1-3 above.
4. Position your photo under the brush/frame layer, so that the area you want to keep is lined up this layer. You can take down the opacity of the brush/frame layer so that you can see what you are doing.
5. Ctrl-Click on the brush/frame layer in the layers palette. You should see dancing ants.
6. Choose Select>Inverse from the menu above.
7. On the layers palette, select your photo layer.
8. Then select delete. This will delete all of the photo outside of the brush/frame layer. It gives you the same look with a few more steps to follow.
Wednesday, September 3, 2008
Clipping Masks
In my efforts to get back into a regular scrapbooking mode, I have decided to post a few of my favorite techniques over the next few weeks. This first technique can help you stretch your collections of scrapbooking embellishments even further. This is called a clipping mask. In this layout I will be referring to the bracket to the right of the layout.

1) Pick out an embellishment that you like the shape or design of. It even can be text. But, maybe it isn't the right color.
2) Next, pick out a piece of paper that you think will go well with your layout.
3) Bring both into your layout. Make sure the paper layer is on top of the element layer.
4) CS3: Using the layers menu, select Create Clipping Mask. Elements: Using the layers menu, select Group with Previous.
5) Viola! You now have a new element that matches your layout perfectly!
Friday, August 22, 2008
Download Junkie
When do you know that you are a download junkie? This week I was digi shopping for a few new items to spruce up my collection. I found a great kit and went to purchase it. I am not a big user of paypal, but from the look of it, it was my only option to pay. So, I paid and then went to download my kit. DO NOT PASS GO! My account was pending receipt of the echeck from paypal. I have to wait for that to get there!? For the past three days I have been checking the site hoping and wishing that today is the day I can download my stuff. Then it hit me. I am a download junkie. There is nothing like instant gratification when you buy a download. No lines or poor customer service when you shop. You can get it NOW! I love that feeling. It seriously made me mad when I couldn't have it. If I had been 3 years old I probably would have thrown a tantrum. BUYERS BEWARE: If you pay with paypal, the same thing could happen to you. And then, you would know that you are a DOWNLOAD JUNKIE!!! Join the club.
Saturday, July 26, 2008
Digital Crop - San Jose
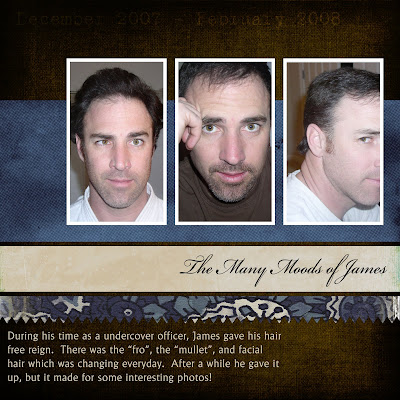
 Right this very minute, I am attending a digital laptop crop at the headquarters of Adobe who makes Photoshop. My friends Jenny, Alison, Cathy, and Ann are here with me. We are having fun learning photoshop techniques, creating our own pages, and eating lots of goodies. The above layout I made using extraction techniques which is one of my favorite things to do. It has been a lot of fun and exciting to be here at Adobe!
Subscribe to:
Posts (Atom)

