Tuesday, December 9, 2008
The Best Deal Ever!
Many of you might be familiar with Linda Sattgast's website for digital scrappers, scrappersguide.com, and all the of the wonderful tips she has to offer. You can sign up to receive her newsletter for free that comes out a couple times a month. You can also sign up for a yearly fee and receive her monthly set of tutorials and kit. I have found this subscription very valuable. They have helped me to improve my skill and the free stuff is great! Just this week, Linda announced that in addition to the free elements and paper, she is also including 12 quick pages that are made from that month's kit. I love quick pages. They help get scrapbooking done so quickly. I am so excited for this new feature to be included in my subscription! It is such a deal. Last I checked the fee was $36 for the year, which if you can't tell already, is a SCREAMIN' deal! So, if you never entertained they idea before, check into it now!
Thursday, October 23, 2008
Halloween Freebie
Halloween is just around the corner and so are all those snapshots you will take of great costumes and treats! While working with other projects, I created these Halloween papers with a couple embellishments. Here is a layout that I created of my grandmother as a witch last year with the papers in the kit:
 For as long as I can remember she has been dressing up as a witch and I am pretty sure it is her favorite holiday.
 If you would like to download this kit of five papers, a banner, & sticker, then click here. Happy Halloween!
Thursday, September 11, 2008
Clipping Mask - Templates
Today I was reading an article on clipping masks and learned that you can use them with those layered templates that you can now buy. I think I already knew this from watching a tutorial but I had completely forgot. So, I got on photoshop and tried it out. Boy, that was easy! Usually when I use these templates I select and delete and use all of these time-wasting steps. I tried it both Photoshop and Elements. Yeah! It works in both programs.
1. Open your layered psd file.
2. Drag your papers and photos into the psd file placing them directly above the layer you would like it to apply it to.
3. With your paper/photo layer seleted, Photoshop: Right-click and select "create clipping mask". Elements: Select Layer>Group With Previous.
4. Now you can move the paper/photo layer around until you get in just the right place.
Once I had my pictures selected. This layout probably took me about 15 minutes to complete!
Tuesday, September 9, 2008
Clipping Mask - Photos
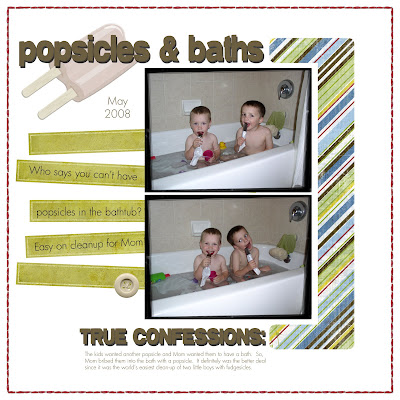
In my last post, I suggested using clipping masks to extend your embellishments even further by pairing them with other papers, etc. In this technique, I used the clipping mask with a photo. It was pretty much the same process. It was a fun way to alter a photo!
 Photoshop Version:
1. Assuming you already have your photo ready, create a new layer for your desired element or brush.
2. Copy your frame to this layer or stamp your brush on it.
3. If you are using a frame or a brush that has an area in the middle that is empty, you will want to fill this. Using your marquee tool, select the area overlapping a little. Then use your bucket and fill it.
4. Move your photo above the brush/frame layer if it is not already in this position.
5. Right-click on the layer name and select Create Clipping Mask.
6. Now you can reposition your photo so that the area you want visible is showing by using your move tool with the photo layer selected. Once this is done you can merge the layers if you like.
If you have Elements, here is one way you can achieve the same results after following steps 1-3 above.
4. Position your photo under the brush/frame layer, so that the area you want to keep is lined up this layer. You can take down the opacity of the brush/frame layer so that you can see what you are doing.
5. Ctrl-Click on the brush/frame layer in the layers palette. You should see dancing ants.
6. Choose Select>Inverse from the menu above.
7. On the layers palette, select your photo layer.
8. Then select delete. This will delete all of the photo outside of the brush/frame layer. It gives you the same look with a few more steps to follow.
Wednesday, September 3, 2008
Clipping Masks
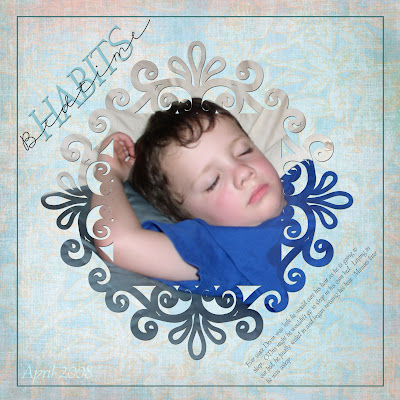
In my efforts to get back into a regular scrapbooking mode, I have decided to post a few of my favorite techniques over the next few weeks. This first technique can help you stretch your collections of scrapbooking embellishments even further. This is called a clipping mask. In this layout I will be referring to the bracket to the right of the layout.

1) Pick out an embellishment that you like the shape or design of. It even can be text. But, maybe it isn't the right color.
2) Next, pick out a piece of paper that you think will go well with your layout.
3) Bring both into your layout. Make sure the paper layer is on top of the element layer.
4) CS3: Using the layers menu, select Create Clipping Mask. Elements: Using the layers menu, select Group with Previous.
5) Viola! You now have a new element that matches your layout perfectly!
Friday, August 22, 2008
Download Junkie
When do you know that you are a download junkie? This week I was digi shopping for a few new items to spruce up my collection. I found a great kit and went to purchase it. I am not a big user of paypal, but from the look of it, it was my only option to pay. So, I paid and then went to download my kit. DO NOT PASS GO! My account was pending receipt of the echeck from paypal. I have to wait for that to get there!? For the past three days I have been checking the site hoping and wishing that today is the day I can download my stuff. Then it hit me. I am a download junkie. There is nothing like instant gratification when you buy a download. No lines or poor customer service when you shop. You can get it NOW! I love that feeling. It seriously made me mad when I couldn't have it. If I had been 3 years old I probably would have thrown a tantrum. BUYERS BEWARE: If you pay with paypal, the same thing could happen to you. And then, you would know that you are a DOWNLOAD JUNKIE!!! Join the club.
Saturday, July 26, 2008
Digital Crop - San Jose
 Right this very minute, I am attending a digital laptop crop at the headquarters of Adobe who makes Photoshop. My friends Jenny, Alison, Cathy, and Ann are here with me. We are having fun learning photoshop techniques, creating our own pages, and eating lots of goodies. The above layout I made using extraction techniques which is one of my favorite things to do. It has been a lot of fun and exciting to be here at Adobe!
Friday, July 11, 2008
Glitter

Who doesn't like a little bling-bling in their life?! I thought that I would share with you a way to make your elements or text sparkle. This glitter effect is really easy. I couldn't believe how simple it was. As you can see from above, you can even use it on your brushes. After you have created your element, just do the following:
1. Select your element's layer.
2. Choose Filter > Noise > Add Noise.
3. At this point you get to choose how much noise you want or how harsh of a glitter effect do you want to have. Use the slide and view window to see where you want the value to be. 50% is a good start. Some colors will look better than others too.
4. Select OK.
Now you have a glitter element. To get the look above, I duplicated my text three times and added noise to all the layers. Then I added bevels and shadows. Good Luck!
Monday, June 16, 2008
Where Is The Digi Chick?
Well, I realize that I haven't posted for two months now. I am not ignoring the world of digital scrapbooking, just checking out another venue. I have been creating digital elements as well. I am planning on putting out another kit within the next two weeks. You would think that having the kids out of school would give me more time. Yeah, right! In the meantime, check out this layout that I scraplifted from a paper magazine for my husband for Father's Day. The kids all helped pick out photos. It is intended to be hung in his office at work to make him smile on those not-so-great days!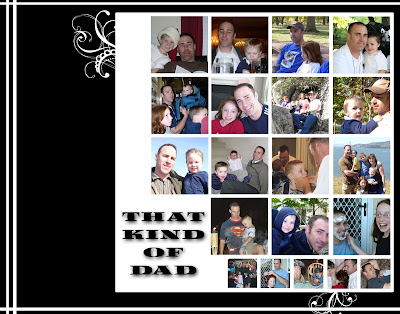
The kids will each add some text of their choice along the left side. It was alot of fun to put together!
The kids will each add some text of their choice along the left side. It was alot of fun to put together!
Tuesday, April 15, 2008
My First Paper Kit!
Ta-Da! Here it is! My first package of digital backgrounds. I have been teaching myself how to create my own stuff for another project and thought why not create things I can use and share with all my friends.
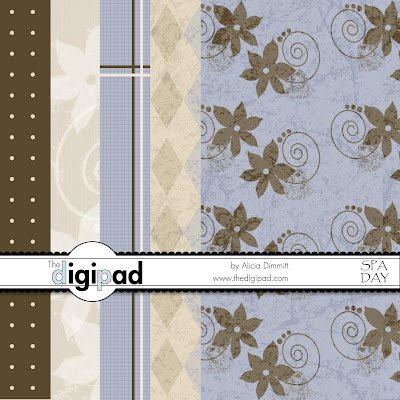
I love blues and browns. They are very soothing colors for me and make me think of spending the day at the spa. I wish I could go more often. If you would like to download this kit, click here. If you create a page with my stuff, send me a link to your gallery or email it to me so I can check it out! Enjoy!

I love blues and browns. They are very soothing colors for me and make me think of spending the day at the spa. I wish I could go more often. If you would like to download this kit, click here. If you create a page with my stuff, send me a link to your gallery or email it to me so I can check it out! Enjoy!
Saturday, April 12, 2008
Designing My Own Stuff!
Recently, I have been pushing myself a little more to learn techniques that will allow me to design some of my own stuff. My mind is constantly in this design mode and my kids see me writing down notes on little pieces of paper as the inspiration comes. It has been fun to see what I can actually come up with. Some stuff ends up in the trash, other stuff gets redone until I am happy with it. All of this made me think about the creative process. Odds are if you are into digitial scrapbooking you have some sort of creative bone in your body. The process of creating something speaks to your inner you. It is satisfying to create something. It is part of you coming out and becomes something personal. I love looking at other people's layouts and seeing their personality come out through color and style. I hope that by next week I will have a few backgrounds designed that I can share with you. Be kind. They aren't over the top, just simple like me. Then maybe you can do a layout with them and share it with me! I would love to see it!
Thursday, April 3, 2008
Just The Right Brush!

Brushes have to be one of the coolest tools out there to scrapbook with digitally. Whenever I feel there is something missing on my page I look to brushes to fill the void. They can be used to accent something or add dimension without overpowering your layout. Even better, when you can't find the brush you are looking for, you can make one yourself! I did just that when designing my header for this page. I wanted some really cool items between my catchy words. I couldn't find exactly what I wanted. So, I took some pictures and made them in to brushes. The best part of brushes is the experimenting with them anyway you feel like and then being able to undo them if it doesn't turn out. Not like real stamps that make you start all over after making a mistake. This is one of my favorite LO using brushes. I used swirls and grunge brushes to reach this effect. You might think that swirls and grunge wouldn't go well together but opposites attract and I think provide great contrast!
Saturday, March 29, 2008
Baby Book Completed!
I finished my last son's baby book this past week and sent it to Shutterfly to be printed. I thought I would put together a slide show to give you a peek of the book. Most of you will never see it anyway, so I hope you enjoy!


Thursday, March 20, 2008
Journaling
When I first started scrapbooking, I loved doing all the artsy stuff. The papers, the embellishments, and the photos were so captivating. I would always finish the page up to the point where I should have added a title and journaling. I had these beautiful books but nothing to let my children know what was the history behind it. Now that I have converted to digital scrapbooking, you would think that journaling would be so much easier and done quickly. I have to confess that I still revert back to my old ways, but I am improving. Journaling is fun to play with and being able to add several fonts in several sizes adds to the creative process. It can go up and down, in a circle, in a heart shape, whatever you can imagine. The boundaries are almost limitless. This is one of my favorite examples of journaling:

First, I love the geometric and monochromatic theme of this two page layout. I picked red to add a little pop to my layout and used it to highlight a few of the words on the first page which listed the things we do traditionally at Christmas. For the rest of my journaling I fit it into a box to continue with the monochromatic theme. I just love how it turned out and the journaling will document those things we do together as a family to celebrate the holidays!
Monday, March 17, 2008
Having Fun With Text
Text has become much more than a tool for writing something for a report or other documents. It has become an embellishment all its own. I love to use text as an embellishment that adds just the right amount of drama and still keeps it simple. By duplicating it, lowering the opacity, changing its color, inserting pictures, . . . the list just keeps going! All of these methods can add just the right touch to finish your layout. I love coming up with a great title for the page and using it in my layout to add the tone I want to carry through to those who will view my creation.
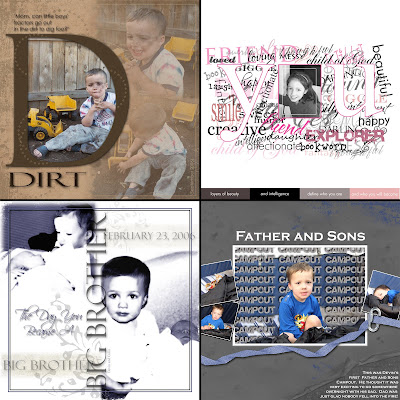

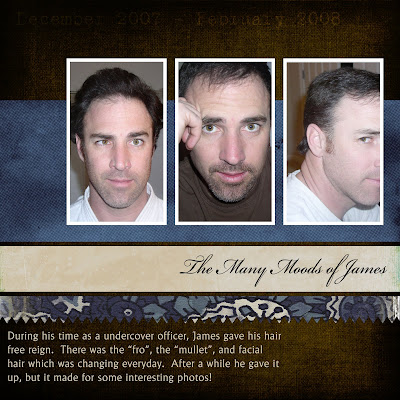
These are some of my favorite layouts using text as a design element. Text is so fun to use. In "Dirt" I used a letter as a frame for the main photo of the layout. The next layout is the front page of my daughter's album. I wanted to use words that I thought described her and generate my own background. In "Big Brother" and "Campout" I played with the position of my text. I love using text vertically. Putting the text behind the object in the picture was an idea I scraplifted from another layout I saw in a magazine. It was a lot of fun to make!
Thursday, March 13, 2008
Fonts are Fabulous!
One of my favorite things about scrapbooking are the fonts. There are some great fonts available to fit every type of layout. So, what makes a great font? Well, besides personal preference fonts that are clean and not overdone are the best. Fonts shouldn't distract from your layout, but add the finishing touches by enhancing your focal point. I like unique fonts but they still need to be readable. Hunting for the perfect font is sometimes easy to find and others are challenging. Things to keep in mind are the style or theme of your page. Are you creating something unique to a certain time period. If the font matches the style of your page or even contrasts it, you're probably on your way to a great layout! Here are a couple sites that I love to get free fonts from:
Another great site is: scrapnfonts.com. At this site fonts range in price from $1-$3 individually. You can also buy bundles and get great deals. Happy Font Hunting!
Another great site is: scrapnfonts.com. At this site fonts range in price from $1-$3 individually. You can also buy bundles and get great deals. Happy Font Hunting!
Tuesday, March 11, 2008
Designing With Photos
I love photography! Photos play such a dramatic impact on your digital layouts. It is becoming a second passion for me. I only wish that my income could support ALL of my expensive hobbies! But, having a simple digital camera is really all you need if you have great software. Sometimes a photo can be the star of the layout with only a few simple words added. Photos also can play a vital role in the colors you choose to use.
If you are looking for a dramatic effect, use a large photo to cover most of the page or all of it. Sometimes I want give my layout a classic, timeless look. Black and white photos fit the bill perfectly. Sepia also works well, adding warmth to the layout. Both of these enhancements can provide great contrast to the photos. Maybe the photo has something in it that you really want to focus on or make stand out. By turning the photo black and white and erasing this part of layer over the item you wish to focus on, the item will pop out and add a little color.
Another fun option, is to give your photos a vintage or hand tinted look. This is a great option for heritage scrapbooks too! Then there are those photos that you love, but turned out less than perfect. Well, don't thrown them out! Give them an artsy touch with a filter or increasing the opacity. They can be used as backgrounds for your layouts or journaling. There are endless options to improve and enhance your photos to add drama to your layout! Here are some examples. So, start taking more pictures!!
Photos as your Focal Point:

Photos as Backgrounds:

Fun Effects with Photos:

Monday, March 3, 2008
What's Your Style?
As I have come more familiar with the digital world I have noticed that it is exploding! Everyone has a blog, website, posted on a website, uploaded video to U-tube, or some other interactive digital experience. We all have probably spent too much time surfing through sites having lost track of time and reality. The one thing I have noticed is that everyone has a style. Sometimes, even when you try so hard to copy that style it is almost impossible. My only conclusion is that it must come from the heart mixed with a little personality.
In my case, I think I have a split personality. I can't put a real description on it. Sometimes my layouts come out cute and sweet, others are definitely more artistic, and yet others are modern with simple lines and geometric shapes. There are things that I love about each one. My friend Jen recently told me that I have a definite style when compared to other scrappers. I guess I should have asked her what that was so I could be a little more informed.
So, what is your style? Do you have one or is it still trying to find itself? Some like old fashion, heritage and others like things sweet and adorable. Simplicity is definitely a style. Getting just the right picture and not overdoing it is definitely a talent. There are grungy styles that are a little more hip and young. I bet your style is all around you without even realizing it. Look at your house, your kid's clothing, your furnishings, etc. Your creative side comes out in all venues. Or, maybe your inner child is screaming to be heard and scrapbooking is that outlet. Whatever it is, go with it. It always makes the best pages!
Tuesday, February 26, 2008
Reasons To Go Digital
I have been scrapbooking since I was in high school. I loved the creative process. As scrapbooking evolved and became a huge industry I was right there buying all the neat things to enhance my scrapbooks which included ones for four other members of my family. I was addicted to paper! (Something I am still plagued by.) The textures and dimensions were great! But as my family grew I had less time and space to create my art. When my friend Alison introduced me to digital scrapbooking, I jumped on that train, no questions asked! I love using my computer and swapping ideas through emails with her and other friends that have started using this method to immortalize their memories. Maybe I can persuade you to go digital with my top ten reasons for doing it myself!
1. Lose the mess: Have you ever tried scrapping with children? They take your mess and make it bigger! I never had time to clean it up anyway!
2. Save Space: With only a computer that can be shut off, I never hear my husband complain and my projects never get destroyed by my kids.
3. Get it Perfect: Okay, for those who know me they know I like things as perfect as I can get them. Now, I can keep fixing it until I get it how I like it!
4. Buy It Once: I love that I can use my digital supplies over and over again. My bank account likes it too!
5. Get Perfect Photos: I like being able to manipulate my photos to any shape, size, or color.
6. Instant Gratification: I love being able to do a project, print it immediately, or email it off in minutes for feedback from friends.
7. Take It With You: This is a hobby I can take anywhere provided my laptop is willing!
8. Shortcuts: Technology makes everything quicker and takes a lot less time than doing everything by hand.
9. Sharing My Work: Emailing and Posting my work is fun. I love to hear the comments and encouragement from friends and family.
10. Preserves Easily: Creating a book or slideshow, saving on a disc or external drive never was easier.
Are you convinced? This site will give you ideas for using all those digital creations. If you are not a digital scrapbooker well stay tuned. This site will also be home to my custom blog banners. Just leave a comment and receive more information!
Subscribe to:
Posts (Atom)

